- Once upon a rainy Friday (which are just so rare in Vancouver) I felt the urge to take full advantage of the, as some would call it, "crappy" weather and bake up a nice batch of cookies. Not content to go for an old staple I raided my Pinterest and came up with these beauties. A twist on a classic oatmeal chocolate chip cookie, already a favourite in my house, the addition of peanut butter could only make them that much more delicious I thought. And I was right. Described by some as "the best cookie they've ever had" the 400 or so cookies this recipe makes (I'm exaggerating but not by much) disappeared quickly, most of which went into my own belly. I will admit I tried to freeze a few for "later" and which turned out to be the next day after a particularly long day. I regret nothing. However, if you haven't quite developed the skill that I have perfected for putting away mass quantities of sweets you may want to half the batch, or you can just give some away. You know where to find me!
- Peanut Butter Chocolate Chip Oatmeal Cookies

- 1/2 cup butter
- 1 1/2 cups peanut butter
- 1 1/2 cups packed brown sugar
- 1 cup white sugar
- 3 eggs
- 1 teaspoon vanilla extract
- 1 tablespoon honey
- 2 teaspoons baking soda
- 4 1/2 cups rolled oats
- 11.4 ounce bag chocolate chips
Preheat oven to 325ºF/160ºC✩ Beat together butter and peanut butter in a large mixing bowl until well combined.✩ Add sugar and brown sugar and mix until smooth.✩ Beat in eggs and vanilla.✩ Add honey and baking soda then stir in oats and chocolate chips.✩ Using an ice cream scooper or large spoon, spoon heaps of mixture onto ungreased cookie sheets leaving room for the cookies to spread out while baking.✩ Bake for 15-17 minutes until golden around edges and just a hint gooey in the centre.✩ Allow to cool on the baking sheet for a few minutes before transferring to a wire cooling rack.In my opinion it's better to take them out a little too soon than too late as slightly gooey is better than crispy in my family but they still taste good either way. Whatever floats your boat.-Hfrom the post on A Dash of Sanity
Tuesday, 8 August 2017
A Midsummer Night's Pean-ut Butter Oatmeal Chocolate Chip Cookie


Friday, 21 July 2017
Oreo By Any Other Name

After moving back to Vancouver (for now) I quickly discovered one thing: I no longer have any friends in Vancouver. If there's one thing I think all people in my mid (okay late) twenties age group can agree on it's that it's hard to meet people when you move to a new (or old) city. Luckily while working in my local salon I stumbled upon Cam, an apprentice and all around wonderful human being who does my hair and listens to my complaints about how terrible my white privileged life is. I am self aware to know that I have no right to complain but it doesn't stop me from doing it.
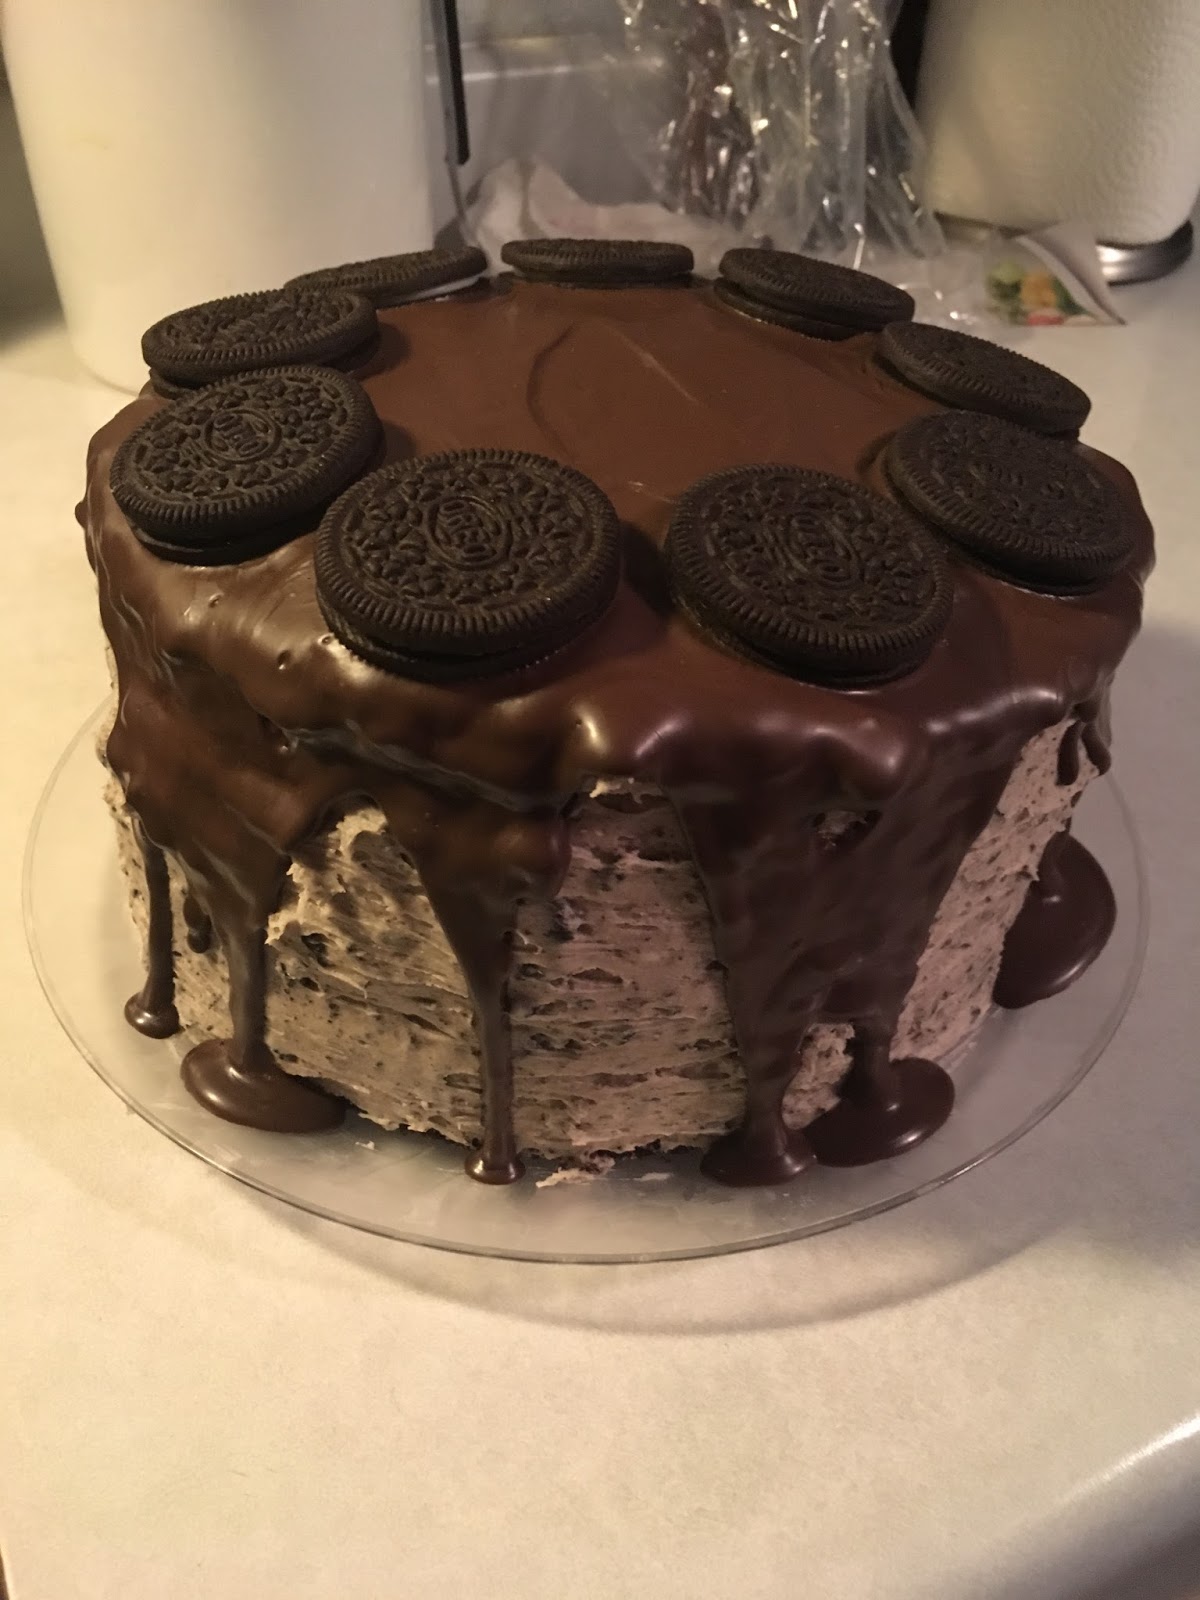
He recently celebrated a birthday and to make him feel special and make sure that he doesn't stop liking me I took it upon myself to bake him a birthday cake! I chose an Oreo drip cake because I knew he liked chocolate, as all good people do, and I'd never attempted a drip cake before. I did actually try it myself as it's hard to explain a birthday cake showing up with a piece missing and I had to run off to my other job but he has assured me many times that it was delicious and so it has earned a place in my arsenal of recipes.
OREO Drip Cake
 Cake
Cake– 400g Unsalted Butter, softened
– 400g Light Brown Sugar
– 400g Eggs (roughly 8 Medium Eggs)
– 325g Self-Raising Flour
– 75g Cocoa Powder
–1tbsp Instant Espresso
– 2tsp Baking Powder
– 4tbsp Whole Milk
Oreo Buttercream
– 300g Unsalted Butter, softened
– 650g Icing Sugar
– 2tsp Vanilla
– 154g Oreos
– 2-5tbsps Whole Milk
Drip
– 175g Dark Chocolate
– 1-2tbsps Vegetable/Sunflower Oil
 For the Cake:
Preheat your oven to 350ºF/180ºC and line three 8 inch cake pans with parchment paper.
Beat butter and sugar until light and fluffy, add in eggs, flour, cocoa powder, espresso, baking powder and mix until just combined. Add enough milk to loosen the batter a little, it should be a similar consistency to brownie batter. Divide between the three pans and spread evenly. Bake for 25-30 minutes until a toothpick comes out clean. Allow to cool in the pan for a few minutes before transferring to a wire rack to cool completely.
For the buttercream:
Beat the butter until smooth then add the vanilla and then the icing sugar 1/3 at a time. Continue to beat until nice and light and fluffy.
Crush the Oreos using either a food processor for nice fine crumbs or a good old fashioned Ziploc bag and rolling pin. I chose the latter and got out some aggression on those poor defenceless cookies.
Add the crushed Oreos to the buttercream and enough milk so the buttercream becomes a nice spreadable consistency.
Make sure your cakes have cooled completely and then assemble by spreading a layer of buttercream on a layer of cake and then stacking them on top of one another. Use remaining buttercream to ice the top and sides.
For the Drip:
Melt chocolate over very low heat and then stir in oil. If you want to get fancy with your decorating you can just drip it down the sides and then save some buttercream to make fancy designs on the top. I just dumped it all on the top spread it around so it dripped off the sides and then squished my leftover Oreos around the edges. I think it looked just fine.
Leave the cake in the fridge to cool and the drip to harden.
Slice. Eat. Repeat as necessary.
-Holly
Saturday, 11 June 2016
Buttermilk Chocolate Cookies
I made some cupcakes last week to celebrate the last day of school and the last day of our Alexander Technique teacher, the amazing Penny O'Connor. They went over very well but left me with about half a tub of buttermilk in the fridge with absolutely no purpose. Realizing it was about to go off I decided to spend my Friday night in baking cookies with it and watching Inside Amy Schumer. I found a recipe that consisted of mainly things I already had that didn't seem like a lot of work which after a day of dress shopping on the dreaded Oxford Street and a trip to the gym was all I could muster. These are amazingly gooey and chewy and fudgey and chocolatey and all the things a cookie should be and I just ate three.
 |
| Enjoy with a cup of "T"! |
Buttermilk Chocolate Cookies
 Ingredients

2 cups all purpose flour
1/2 tsp baking soda
1/2 C butter
3/4 C cocoa powder
2 C sugar
1 tsp vanilla
2/3 C buttermilk
100g chocolate chips
100g milk chocolate chips
Instructions

- Line baking sheets with parchment paper and preheat your oven to 180º
- Whisk the flour and baking soda together in a small bowl.
- Place the cocoa powder into a large bowl, melt the butter and add it to the cocoa whisking until smooth.
- Add the sugar, vanilla, and buttermilk, and continue to whisk until all ingredients are combined.
- Add in the flour, a little at a time, and mix thoroughly after each addition.
- Add the chocolate chips and stir.
- Form the dough into 1 inch balls and place them onto the baking sheet 2 inches apart.
- Bake the cookies for 10-15 minutes.
- Allow to cool on the baking sheet for three minutes, and then transfer the cookies to a wire rack to completely cool.
Tuesday, 29 March 2016
Beware The Eggs of March
 My favourite thing about Spring is not the warming temperature nor the blossoming daffodils or even the fact that it's my birthday. No, dear reader(s) my favourite thing about Spring is that it means I can make and (over)indulge in one of my favourite seasonal Easter treats: Cadbury Crack. This is not your average annual Easter cookie or cupcake, this is the mother of all Easter treats and it combines pretzels, toffee, chocolate, coconut and mini eggs and it's so delicious you will eat it until you feel sick and then keep going. It's the mini eggs that make it Easter otherwise you could eat it all year round but then I'd probably have diabetes and weight about a thousand pounds.
Cadbury Crack
 1 bag salted pretzels (if you can find the stick ones their easier to lay flat)
1 1/4 cup salted butter
1 1/4 cup packed dark brown sugar
1 tsp vanilla extract
250 g baking chocolate
1/2 cup shredded coconut
1 family sized bag of mini eggs (300g)
-Preheat oven to 200ºC.
-Line a baking sheet with parchment paper and evenly spread the pretzels across the pan.
-In a medium sized pot melt the butter and sugar and bring to a boil. Let boil for 2-3 minutes until thickened. Add the vanilla and stir.
-Pour the mixture evenly over the pretzels and bake for approximately 6 minutes. Meanwhile, melt the chocolate.
-Remove the toffee and pretzels from the oven and allow to cool until no longer bubbling. Then pour the chocolate over the top. Sprinkle with coconut and crushed mini eggs and refrigerate for at least one hour before breaking into small pieces and binging.
 |
| Don't eat in bed if you're not willing to wash chocolate out of your sheets! |
Hoppy Easter!
Sunday, 10 January 2016
Roman Holly-day Pasta
 |
| Paired nicely with the Ravenswood Zinfandel |
We personalized it a bit due to laziness and things we had around but it turned out incredibly delicious and as I return to my life of living off of eggs on toast and smoothies I remember it fondly with just a hint of longing (as I do of the person I made it with).
 |
| Seriously, ridiculously good looking |
Inspired by Audrey Spaghetti al Pomodoro with Chorizo
Serves 2
1 devilishly handsome man to help
.65 kg vine-ripened tomatoes
1/2 onion, peeled
1 celery stalk
1 carrot, peeled
basil leaves, chopped, plus extra for garnish
extra-virgin olive oil
salt
freshly ground black pepper
1/2 large chorizo sausage
500 g spaghetti
parmigiano-reggiano cheese
Cook tomatoes (we added about a cup of oven roasted cherry tomatoes for sweetness), celery, carrot and onion in a large pan with a lid over it at a high heat for about 10 minutes to soften vegetables.
Remove the lid and continue to boil for 10-15 minutes, stirring with a wooden spoon. Lower the heat to medium-low, and add basil leaves, chorizo and a drizzle of olive oil. The sauce is ready when the bubbles are no longer made of water but rather small craters of sauce. Or whenever.
Remove from stove and season with salt and pepper.
Fill a large pot with cold water and place over a high heat to bring to a boil. Add the pasta and a small handful of sea salt. When done, drain and dish onto plates, topping with sauce, parmigiano and a few extra leaves of basil.

Toffee Mocha Torte, How Obscenely Decadent
Hello Dear Readers! ie. Mum (and Matt?)
 The past few months have been busy with school and moving and I've had next to no time to bake. Luckily, I'm home in Vancouver for a few weeks for the Christmas break so not only do I have spare time to pursue hobbies (such a strange feeling) but I also have all kinds of lovely tools to use!
 Toffee Mocha Torte
 The past few months have been busy with school and moving and I've had next to no time to bake. Luckily, I'm home in Vancouver for a few weeks for the Christmas break so not only do I have spare time to pursue hobbies (such a strange feeling) but I also have all kinds of lovely tools to use!
I've been invited to a friend's birthday celebration tonight as my one social engagement whilst I'm here and I offered to bring dessert so I'd have an excuse to use my beloved KitchenAid. Bonus, I picked a recipe also requiring coffee so I got to use my espresso machine too, it's so nice being with my loved ones. I'm making a cake I first made a few years ago for Thanksgiving, but that was pre blog so now I have the opportunity to share this delicious and incredibly simple cake with you!
It's about -4ºC outside right now so it's a perfect day to crank Adele, reflect on any deep unrequited love (childhood sweetheart, ex-lover, boss, those shoes you had to leave behind in Selfridges) and allow the warmth of the oven to thaw your cold, dead heart. No, just me?
 Toffee Mocha Torte
(serves: a lot)
1 cup butter, softened
2 cups sugar
2 eggs
1 1/2 teaspoons vanilla
2 2/3 cups flour
3/4 cocoa powder
2 teaspoons baking soda
1/4 teaspoons salt
1 cup buttermilk
1 cup coffee
1 tbsp strong coffee (or 1 tbsp hot water and 1/2 tsp instant coffee)
2 cups heavy whipping cream
3 tbsp light brown sugar
250 g toffee pieces (in Canada I use Skor bits, I'm hunting for an alternative in the UK)
1. Cream butter and sugar until "fluffy"(when does it ever look fluffy?) Add eggs, one at a time, beating well after each one. Beat in vanilla.Then, combine the flour, cocoa, baking soda and salt and add it to the creamed mixture a little at a time alternating with buttermilk or else it will explode everywhere and you'll curse loudly. Beat well after each addition. Stir coffee into batter.
2. Pour into three greased and floured 22 cm (9 inch) round baking pans. Bake at 180ºC (350ºF) for 20 minutes or until a toothpick comes out clean. Mine took closer to 30 minutes but I think I used smaller pans and therefore they were thicker. You can see how precise I am about these things.
3. For the whipped cream topping, pour coffee into a large bowl; cool. Add the cream and brown sugar. Beat until stiff peaks form. Place whichever cake you decide should be the bottom layer on a serving plate; top with approximately 1/3 of topping and sprinkle liberally with toffee bits. Repeat until cake is fully formed. Store in the refrigerator.
4. Transport to venue, put in candles, light, serve to handsome birthday boy and hopefully dazzle with your baking talents.

Happy Baking!
-Holly

Happy Baking!
-Holly
Tuesday, 14 July 2015
Love is blonde, and lovers cannot see
I don't know what I just did, but it was delicious. I'm not entirely sure what I was expecting when I made this recipe but this wasn't it. I went into this with the intention of making Snickerdoodle Blondies. For those who don't know a Blondie is basically just a brownie without cocoa giving it more of a toffee flavour than chocolate. Even though I wasn't baking for Count No-chocula he has made me more aware of recipes that contain chocolate so his presence lingers on long after the dust (flour? cocoa powder?) has settled. Also I just happened to have all the ingredients needed on hand so it's not like I'm thinking about him or anything..
 So these Snickerdoodle Blondies are a white, toffee-esque chewy square with cinnamon sugar sprinkled on the top. I had to cut the recipe into 2/3, because I'm a glutton for punishment and a mathematical challenge and also because that's approximately how much smaller our pan was than the one used in the original recipe. I used butter instead of the Crisco used in the original recipe (because Crisco makes me uncomfortable unless it's in pastry and even then I have to not think about it) and they ended up a little on the greasy side, but seriously as long as there was a serviette close by who cares, they tasted amazing. The bake time/temperature was also a bit off on my oven and so I ended up with gooey centres and crispy tops and sides which is the greatest thing ever and I'm not complaining.
 Snickerdoodle Blondies
1 c butter, softened
1 1/2 c sugar
1/2 dark brown sugar, packed
2 eggs
1/2 tbsp vanilla
2 c flour
2 tsp baking powder
1 tsp cinnamon
less than 1/2 tsp salt
Topping:
2 tbsp sugar
2 tsp cinnamon
Preheat your oven to 180º C (350º F, gas mark4) and line a 9x13 pan with parchment paper (purely for ease of cleanup, you can lightly grease the pan and just whack it right in if you don't mind doing the dishes)
Cream butter, both sugars, eggs and vanilla until smooth. Add in flour, baking powder, cinnamon and salt and mix until well combined. Pour it into your prepared pan and spread evenly using a rubber spatula or your good ol' hands. Sprinkle with the cinnamon sugar mixture and bake for 30 minutes or until golden brown and the centre has set.
Clean up the flour that has managed to cover 2/3 of your kitchen.
That last one might just be for me.
 Happy Baking!
-Holly

 Snickerdoodle Blondies
1 c butter, softened
1 1/2 c sugar
1/2 dark brown sugar, packed
2 eggs
1/2 tbsp vanilla
2 c flour
2 tsp baking powder
1 tsp cinnamon
less than 1/2 tsp salt
Topping:
2 tbsp sugar
2 tsp cinnamon
Preheat your oven to 180º C (350º F, gas mark4) and line a 9x13 pan with parchment paper (purely for ease of cleanup, you can lightly grease the pan and just whack it right in if you don't mind doing the dishes)
Cream butter, both sugars, eggs and vanilla until smooth. Add in flour, baking powder, cinnamon and salt and mix until well combined. Pour it into your prepared pan and spread evenly using a rubber spatula or your good ol' hands. Sprinkle with the cinnamon sugar mixture and bake for 30 minutes or until golden brown and the centre has set.
Clean up the flour that has managed to cover 2/3 of your kitchen.
That last one might just be for me.

-Holly
Sunday, 5 July 2015
Emergency Peanut Butter Cookies

I hate having people over and not having something to offer them.
Other than my charming
personality, obviously but you can't eat that. So what do you do
when you have a guest coming over who doesn't drink tea or coffee and is
allergic to chocolate? Find new friends. No, I'm kidding, sort of. It's good to
have people in our lives who challenge us and to be fair, if he wasn't such a
weirdo I never would've discovered this amazing peanut butter cookie recipe. So
even if he turns out to be a complete dud in the end at least I can drown my
sorrows in a chewy, nutty gem that, come to think of it would be delicious with
a slab of dark chocolate in the middle.
Chewy Peanut Butter Cookies
Makes about 20 small cookies
1/2 c butter, softened
1/2 c sugar
1/2 c packed dark brown sugar
1/2 c crunchy natural peanut butter
1 egg
1 tsp vanilla
1 1/2 c flour
1 tsp baking soda
-Preheat your oven to 180ºC (350ºF - gas mark 4).
-In the bowl of a stand mixer (or in a bowl with a wooden spoon
and a little elbow grease) cream butter and sugars.
-Add the peanut butter, egg and vanilla and mix until blended.
-Blend in the flour and baking soda until just combined.
-Scoop in small balls and place on parchment lined baking trays.
-Bake for about 10-12 minutes, keeping an eye on them until
they're evenly golden brown and the tops are starting to crackle.
- Store in an airtight container for the all of two days they will
last before being gobbled up. These lasted three until Carl came home but we
were also using them as a main source of fuel as I've been too lazy to grocery
shop this week.

Happy Baking (and socializing!)
-Holly
Friday, 12 June 2015
No Pudge Fudge
 I'm having to eat my words these days, but I'm actually alright with it as they taste like fudge! I've never bought into this whole gluten, dairy, sugar, fat, free dessert thing, banana oatmeal cookies just aren't as good as oatmeal chocolate chip. If you were going to eat the calories you might as well just have the chocolate chip cookie because at least you'll enjoy it more! But when Lauren was faced with balancing an elimination diet with her sweet tooth I figured the universe had sent me to live in her house for three weeks to solve this conundrum. Really, I lucked out because this was the first recipe I tried so it wasn't like I had thirty different awful cardboard brownies in the garbage before I found a winner but I guess I picked a pretty safe bet with coconut and chocolate.
 If you like coconut and chocolate then you will love this fudge, period. Doesn't matter if you're trying to be healthy or not the bottom line is it's really, really good
COCONUT OIL CHOCOLATE FUDGE
1/2 c. coconut oil, melted
2 1/2 tbsp coconut or almond milk
2 1/2 tbsp cocoa powder
2 tbsp agave nectar
1 tsp vanilla extract
1. Melt the coconut oil over low heat.
2. Combine all ingredients and stir until smooth.
3. Pour into either a parchment line 4x4 (small) dish or an ice cube tray.
4. Put in freezer until solid.
5. Keep refrigerated or frozen.

Obviously the whole "No pudge" thing isn't really true but hey if it's delicious and healthier than the alternatives what's not to enjoy!?
Happy (healthy) indulging!
-Holly
Monday, 11 May 2015
Lemon Coconut Cake
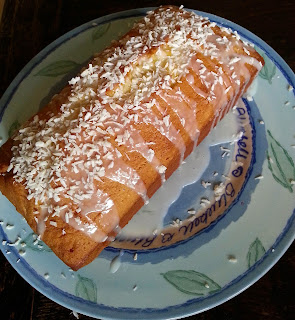
This is another round of "what's about to go bad that I can turn into something delicious" baking. I discovered some lemons that were about to turn hanging out in the fruit basket here so I found this recipe for Lemon Coconut Bread that looked like it could be a winner. The recipe called it a bread, but let's be honest it's a bread in the same way that a Big Mac is an appetizer. As far as I'm concerned calling banana bread a bread is a bit of a stretch, it doesn't require yeast or kneading, it's sweet and cakey, it's cake. Although whatever you call it, it's damn good.

This particular cake is a moist and fluffy with a lovely crunch on the outside. It's full of lemon flavour with just a hint of coconut. Not enough that you feel like you're eating a Pina Colada (or sunscreen) but enough that you can feel the warm breeze of the Pacific Ocean as you stuff your face and feel grateful that this hint of the tropics can be enjoyed in your comfy pants without the risk of sunburn. I added some extra coconut and lemon to my version for the extra boost. Assembly is quick and painless (with the exception of zesting the lemons which can either be a breeze or a pain depending on the day) and the real test is waiting patiently while it's in the oven for 40 minutes. It's worth the wait though, I assure you.
Lemon Coconut Cake
-1/2 c butter, softened
-1 c sugar
-2 eggs
-3 tbsp lemon juice
-grated peel of 3 lemons
-1 1/2 c flour
-1 tsp baking powder
-1/2 c coconut milk
-1/2 c shredded coconut
For the glaze:
-icing sugar
-lemon juice
-shredded coconut for sprinkling

Enjoy!
-Holly

This particular cake is a moist and fluffy with a lovely crunch on the outside. It's full of lemon flavour with just a hint of coconut. Not enough that you feel like you're eating a Pina Colada (or sunscreen) but enough that you can feel the warm breeze of the Pacific Ocean as you stuff your face and feel grateful that this hint of the tropics can be enjoyed in your comfy pants without the risk of sunburn. I added some extra coconut and lemon to my version for the extra boost. Assembly is quick and painless (with the exception of zesting the lemons which can either be a breeze or a pain depending on the day) and the real test is waiting patiently while it's in the oven for 40 minutes. It's worth the wait though, I assure you.
Lemon Coconut Cake

-1/2 c butter, softened
-1 c sugar
-2 eggs
-3 tbsp lemon juice
-grated peel of 3 lemons
-1 1/2 c flour
-1 tsp baking powder
-1/2 c coconut milk
-1/2 c shredded coconut
For the glaze:
-icing sugar
-lemon juice
-shredded coconut for sprinkling
- Line a loaf pan with greaseproof paper. You can also just grease and flour the pan but it makes clean up a little more tricky.
- Preheat oven to 180ºC(350ºF).
- Cream butter and sugar until smooth and fluffy. Add eggs, lemon juice and peel and mix well.
- In a separate bowl combine flour and baking powder. Slowly add to the butter mixture and mix until well blended.
- Mix in the coconut milk and shredded coconut and then pour into the prepared pan.
- Bake for 40-50 minutes depending on your oven until a toothpick inserted into the centre comes out clean. (If the top starts to get a bit too brown for comfort throw some tin foil over the top to stop it from burning)
- Let cool completely on a wire rack before glazing.
- For the glaze simply mix icing sugar and lemon juice until you reach a desirable drizzling consistency. Drizzle over cooled cake and sprinkle with extra shredded coconut.


Enjoy!
-Holly
Wednesday, 6 May 2015
Covent Garden Hotel Afternoon Tea
This post comes to you from lovely Essex as I rely on the generosity of friends to keep me off the streets here in London. We have found a flat we like and our offer was accepted yesterday, but unfortunately the property isn't available for us to move in until the 25th at the earliest so I've got some time to kill while I apply for jobs and try to get my life together.
 |
| Photo courtesy of afternoontea.co.uk |
My parents were in town last week which was wonderful as getting to this stage of finding a flat was an absolute nightmare and it was nice to have someone to hold me as I sobbed hysterically every night. I think I gave my parents a fairly accurate view of what it's really like to live in London. While they were here I took my mum out for afternoon tea as an early Mother's Day present as I won't be around for the actual event. We looked at a few places online at www.afternoontea.co.uk and selected the Covent Garden Hotel due to it's appealing menu and lovely looking dining room. We were not disappointed.
 |
| photo courtesy of tripadvisor.co.uk |
Tea is held in the hotel's restaurant Brasserie Max and my mum and I were sat right on the window at a lovely little silver table for two looking out onto cobbled streets and shoppers. I'm afraid all the pictures on this post are stolen from other websites as it was so lovely inside that I didn't want to ruin the moment by pulling out my phone and snapping pictures. I suppose this is something I'll have to get over if I wish to continue this blog! The staff were friendly and attentive from the moment we turned towards the hotel and the doors were opened for us by two lovely gentlemen who showed us to the restaurant. Mum and I selected one Vintage Tea menu and one Covent Garden Tea menu to give ourselves a bit of variety. Each tea includes coffee, hot chocolate or basic tea. Herbal teas are extra, but they gave me some soy milk for my Earl Grey free of charge.
 |
| photo courtesy of tripadvisor.co.uk |
It was a bit of a wait for the food, but we didn't mind as we knew it was because everything was being made fresh and we sat, sipping our tea and enjoying the people watching. Our food arrived on it's traditional three tiered platter and the waitress explained what everything was. We had a selection of finger sandwiches including smoked salmon and cream cheese bagel, egg, cheese and pickle and chicken salad. The bread was so soft and fresh and the fillings were flavourful and perfectly paired. We enjoyed them so much we even went for a second round! My only complaint was that the bagel crostini with the smoked salmon was so hard I thought I was going to break a tooth and my mum had to resort to eating the topping off and leaving the bagel which she remarked made her feel a bit like a five year old who only eats the icing. We followed our sandwiches with plain and strawberry scones both of which were soft and moist on the inside with a delicious crunch on the outside. I could've gone for a second round of those as well, but I knew I'd better not! After that it was onto the desserts which ranged from a chocolate caramel opera cake to a rhubarb custard mille feuille to a mini banoffee pie. Each was flavourful and sweet without being overly sugary or too strong. There was even a cucumber elderflower jelly that mum and I both enjoyed very much even though neither one of us was expecting to.
 |
| photo courtesy of tripadvisor.co.uk |
We left, stuffed and filled to the brim with two pots of tea each, and all for about £50 thanks to a %20 off from afternoontea.co.uk. I will definitely be returning when I have the funds to indulge again!
-Holly
Wednesday, 22 April 2015
Coconut Crunch Cookies
Cookie week is drawing to a close. It's a short week, let's just pretend that tomorrow is a holiday because Papa Bear has about 11 bags of cookies in the freezer and believe it or not, I'm tired of baking. Really I'm more tired of doing the dishes after baking so it looks like this may be it for me and the KitchenAid mixer until Christmas and I will miss him. But I leave Vancouver on a (sugar)high note with these amazing Coconut Crunch Cookies. The cookies themselves aren't crunchy, they're nice and moist and cakey, the crunch comes from the almonds and the coconut. In a limited study of my family and the people I worked with when I made them last they were rated very highly.


 Until London, Happy eating!
-Holly
Coconut Crunch Cookies
make a lot (3 dozen maybe?)
1 c butter, softened
3/4 c sugar
3/4 c packed brown sugar
2 eggs
2 tsp vanilla extract
1 tsp almond extract
2 c flour
1 tsp baking soda
3/4 tsp salt
2 c flaked coconut
1 package milk chocolate chips
1-1/2 c chopped toasted almonds
Cream butter and sugar until light and fluffy.
Beat in eggs and extracts.
In a separate bowl, combine flour, baking soda and salt. Gradually add to butter and mix until combined.
Stir in coconut, chocolate chips and almonds.
Drop in 1-1/2 inch scoops onto ungreased cookie sheets and bake for 12-15 minutes at 350ºF (180ºC) until lightly browned.
Transfer to a wire rack to cool.
Share with people who you want to like you.
-Holly
Tuesday, 21 April 2015
Chocolate Truffle Cookies
I write this to you on a rainy, dark Vancouver evening sitting in my jammies in front of the fire which anyone who knows me knows is just how I like it. What goes well with dark, rainy evenings? Well, a lot of things, but fudgy, moist oh so chocolatey cookies for one! So for day 3 of cookie week I introduce to you....the Chocolate Truffle Cookie. It's normally what I would consider a "seasonal cookie" but maybe that's just because I first made them for Christmas two years ago but there's no rule in my book, written or unwritten, that says you can't enjoy these babies year round.

Like the name implies they're basically the cookie form of the inside of a chocolate truffle. Dark, with a rich chocolate flavour that quite literally melts in your mouth. Whatever you do, don't eat the dough or else they won't make it to the oven, but then you can reward your self restraint by licking the bowl and spoon until all you can taste is porcelain.
Chocolate Truffle Cookies
Makes 24 (less, if you start on the dough, I got 20 out of my last batch)
4 oz unsweetened chocolate
 2 c semi-sweet chocolate chips, divided
1/3 c butter
1 c sugar
3 eggs
1-1/2 tsp vanilla
1-1/2 c flour
2 tbsp cocoa powder
1/4 tsp baking powder
1/4 tsp salt
icing sugar for dusting
In the microwave (carefully!) or in a heatproof bowl over boiling water, melt the unsweetened chocolate, butter and 1 c of chocolate chips.
Let stand to cool for 10 minutes.
Meanwhile beat the egg and sugar, add the cooled chocolate mixture and vanilla.
In a separate bowl combine flour, cocoa, baking powder and salt.
Gradually beat the flour mix into the chocolate until just combined.
Stir in remaining chocolate chips.
 Cover and refrigerate for about 3 hours or until firm enough to easily shape into balls.
Scoop out enough dough to make 1-1/2 inch balls. Place each ball 2 inches apart on an ungreased cookie sheet.
Lick off all the gooey dough that is stuck to your hands, spoon, bowl, kitchen counter wherever.
Bake at 350ºF (180ºC) for 10-12 minutes until the tops begin to crack. Transfer to a wire rack to cool completely. Dust with icing sugar.
If you don't want the gooeyness all over your hands you can flour them ahead of time to prevent sticking, but I mean really, why bother?
Happy licking!
-Holly
Like the name implies they're basically the cookie form of the inside of a chocolate truffle. Dark, with a rich chocolate flavour that quite literally melts in your mouth. Whatever you do, don't eat the dough or else they won't make it to the oven, but then you can reward your self restraint by licking the bowl and spoon until all you can taste is porcelain.
Chocolate Truffle Cookies
Makes 24 (less, if you start on the dough, I got 20 out of my last batch)
4 oz unsweetened chocolate
2 c semi-sweet chocolate chips, divided1/3 c butter
1 c sugar
3 eggs
1-1/2 tsp vanilla
1-1/2 c flour
2 tbsp cocoa powder
1/4 tsp baking powder
1/4 tsp salt
icing sugar for dusting
In the microwave (carefully!) or in a heatproof bowl over boiling water, melt the unsweetened chocolate, butter and 1 c of chocolate chips.
Let stand to cool for 10 minutes.
Meanwhile beat the egg and sugar, add the cooled chocolate mixture and vanilla.
In a separate bowl combine flour, cocoa, baking powder and salt.
Gradually beat the flour mix into the chocolate until just combined.
Stir in remaining chocolate chips.
Cover and refrigerate for about 3 hours or until firm enough to easily shape into balls. Scoop out enough dough to make 1-1/2 inch balls. Place each ball 2 inches apart on an ungreased cookie sheet.
Lick off all the gooey dough that is stuck to your hands, spoon, bowl, kitchen counter wherever.
Bake at 350ºF (180ºC) for 10-12 minutes until the tops begin to crack. Transfer to a wire rack to cool completely. Dust with icing sugar.
If you don't want the gooeyness all over your hands you can flour them ahead of time to prevent sticking, but I mean really, why bother?
Happy licking!
-Holly
Subscribe to:
Posts (Atom)