So I had a minor fender bender in Papa Bear's car this week. A
traumatic experience all in it's own, and of course one with financial
implications. I'm fine physically but needless to say I was feeling pretty low
about the whole thing. My parents are wonderful people who do so much for me
and I go and wreck their stuff and give them stress. I was feeling pretty low
about the whole thing (The phrase "useless waste of a human being"
went through my mind a couples times) so I decided to contribute to the family
in the best way I know how: food. Because nothings says "I'm sorry"
like something fresh from the oven.
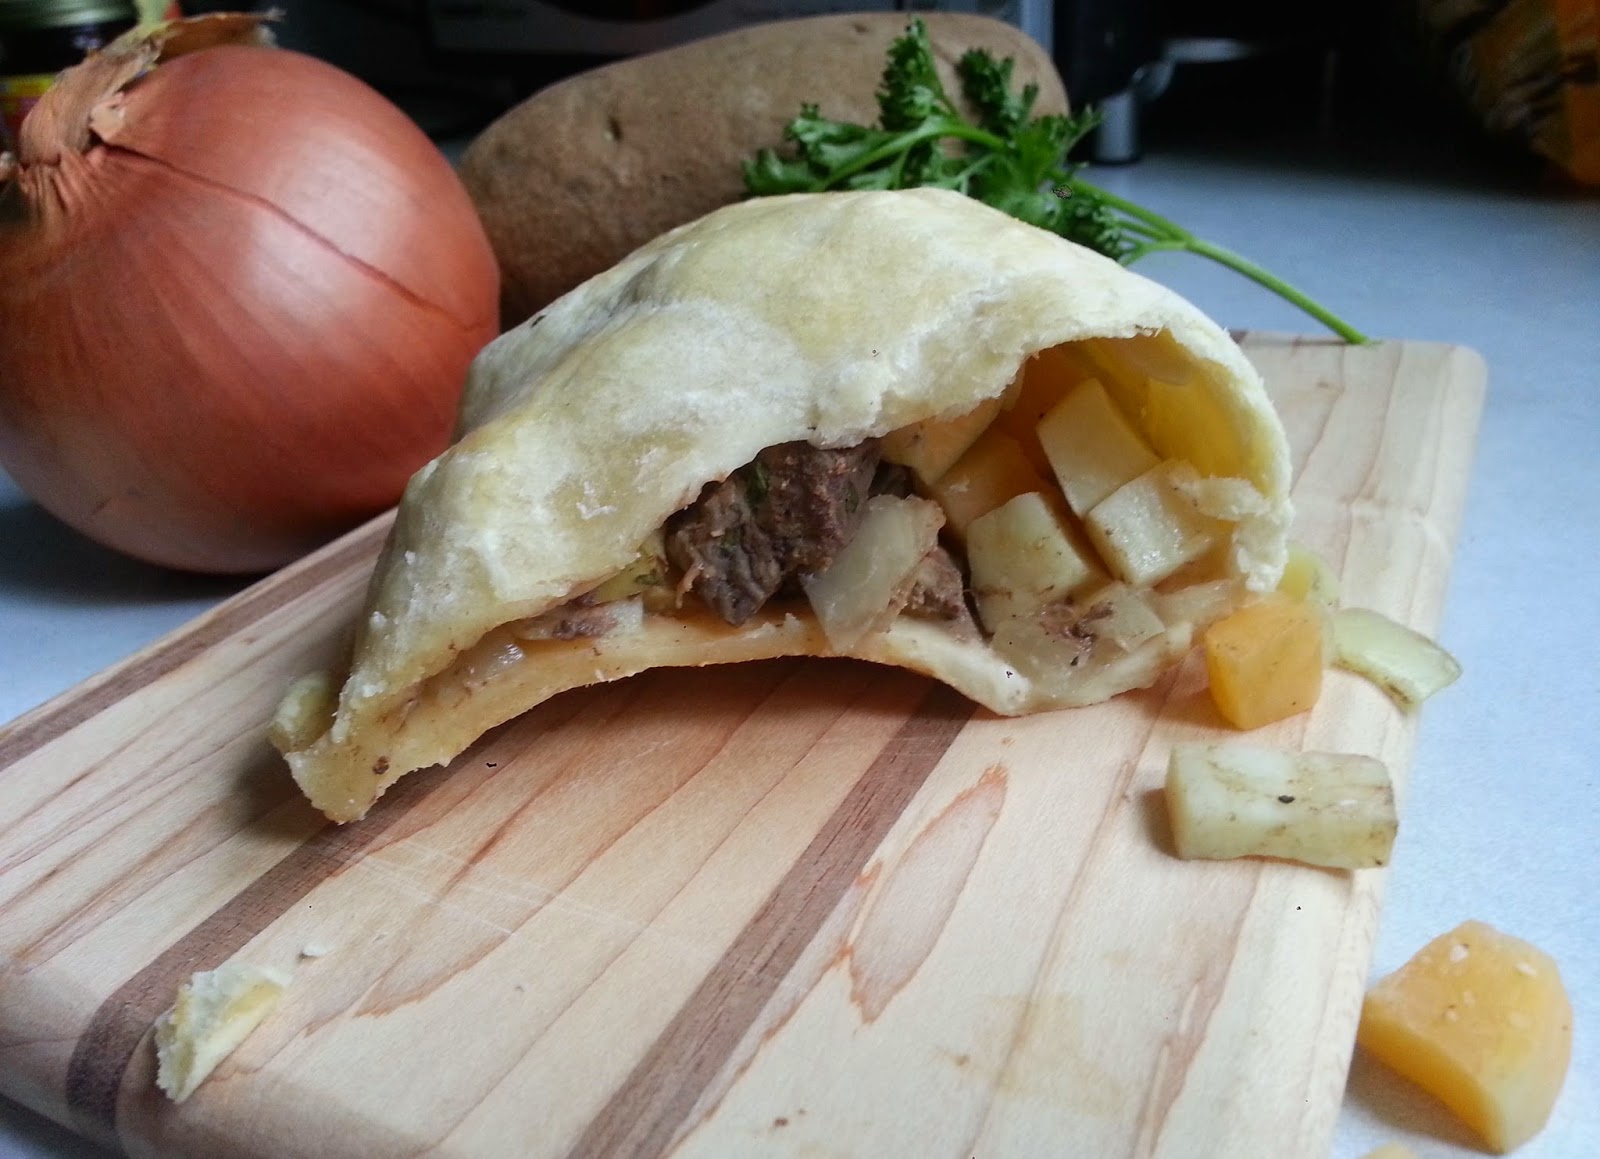
We're big fans of pastry in my family so I decided to
try my hand at some Cornish Pasties. I combined two recipes, one from Paul
Hollywood and one from my Taste of Home cookbook to create my perfect pasty.
They're not complicated to make, just time consuming with the chopping and
peeling and baking. I've discovered that chopping is possibly one of my least
favourite things to do in the kitchen. I'm alright when a recipe calls for a
"rough chop", in that case pretty much anything goes so long as it's
somewhat smaller than the item is in it's original shape. When a recipe
specifies something like 1cm cubes (as this one did) it gets a bit annoying as
I get very particular and it takes longer than it really needs to.
CORNISH PASTIES
(Give yourself about 2 hours for prep and baking)
Makes 4 ginormous portions

CORNISH PASTIES
(Give yourself about 2 hours for prep and baking)
Makes 4 ginormous portions
Start by making your pastry. For that, you'll need:
250 g strong white bread flour
250 g all-purpose flour
120 g shortening
Pinch of salt
25 g margarine or butter
175 ml cold water
1 egg or 1 tbsp egg whites
-Measure your flour into a medium bowl. Add shortening, salt, margarine (or butter) and water.
-Use a wooden spoon to combine all the ingredients and then get in there with your hands until it's formed a dry dough.
-Knead the dough on a clean work surface to combine the ingredients properly.
Paul Hollywood's kneading instructions: Use the heel of your hand to stretch the dough. Roll it back up into a ball, then turn it, stretch it and roll it up again. Repeat process for about 5-6 minutes. The dough will start to become smooth as the shortening breaks down. If the dough feels grainy, keep working it until it's smooth and glossy. Don't be afraid to get rough - you'll need to use lots of pressure and work the dough vigorously to get the best results.
-When the dough is smooth, wrap it in cling film and put it in the fridge to rest for 30-60 minutes.
While your dough is resting, begin your filling.
For the filling you'll need:
350 g good-quality beef skirt, or top round steak.
350 g waxy potatoes
200 g swede (aka rutabaga)
175 g onion
Chopped fresh parsley
Salt and Pepper
Knob of margarine or butter
-Peel and cut the potato, swede and onion into cubes about 1cm (the dreaded chopping!!). Cut the beef into similar sized chunks. Combine all in a bowl and season with salt, pepper and parsley.
 -Lightly grease a baking tray.
-Start preheating your oven to 170ºC (325ºF).
-Once the dough has had time to relax, take it out of the fridge (it should be firm as the shortening has solidified again). Divide it into four equal-sized pieces. Shape each piece into a ball and use a rolling pin to roll each ball into a disc roughly 25 cm/10 inches.
-Spoon a quarter of the filling onto each disc. Spread the filling on one half of the disc, leaving the other half clear. Put a knob of butter or margarine on top of the filling.
Carefully fold the pastry over, join the edges and push with your fingers to seal. Crimp the edge to make sure the filling is held inside either using a fork, or by making small twists along the sealed edge. Fold the corners underneath.
-Put the pasties onto the baking tray and brush the top of each with the egg. Bake on the middle shelf of the oven for about 45 minutes or until golden brown. Mine weren't browning fast enough for my liking so I ended up cranking my oven up to about 375ºF for the last 20 minutes. They still could've been darker in my opinion, but they were cooked which is what matters.
The recipes both said "4 servings" however my family of three made it through two pasties between us. They're HUGE and no one in my family has ever been accused of not eating enough. Especially when it comes to pastry. They're equally delicious reheated one or two days later though, so we're not struggling.
Paul's Pasty Recipe
Taste of Home Recipe
250 g strong white bread flour
250 g all-purpose flour
120 g shortening
Pinch of salt
25 g margarine or butter
175 ml cold water
1 egg or 1 tbsp egg whites
-Measure your flour into a medium bowl. Add shortening, salt, margarine (or butter) and water.
-Use a wooden spoon to combine all the ingredients and then get in there with your hands until it's formed a dry dough.
-Knead the dough on a clean work surface to combine the ingredients properly.
Paul Hollywood's kneading instructions: Use the heel of your hand to stretch the dough. Roll it back up into a ball, then turn it, stretch it and roll it up again. Repeat process for about 5-6 minutes. The dough will start to become smooth as the shortening breaks down. If the dough feels grainy, keep working it until it's smooth and glossy. Don't be afraid to get rough - you'll need to use lots of pressure and work the dough vigorously to get the best results.
-When the dough is smooth, wrap it in cling film and put it in the fridge to rest for 30-60 minutes.
While your dough is resting, begin your filling.
For the filling you'll need:
350 g good-quality beef skirt, or top round steak.
350 g waxy potatoes
200 g swede (aka rutabaga)
175 g onion
Chopped fresh parsley
Salt and Pepper
Knob of margarine or butter
-Peel and cut the potato, swede and onion into cubes about 1cm (the dreaded chopping!!). Cut the beef into similar sized chunks. Combine all in a bowl and season with salt, pepper and parsley.
-Lightly grease a baking tray. -Start preheating your oven to 170ºC (325ºF).
-Once the dough has had time to relax, take it out of the fridge (it should be firm as the shortening has solidified again). Divide it into four equal-sized pieces. Shape each piece into a ball and use a rolling pin to roll each ball into a disc roughly 25 cm/10 inches.
-Spoon a quarter of the filling onto each disc. Spread the filling on one half of the disc, leaving the other half clear. Put a knob of butter or margarine on top of the filling.
Carefully fold the pastry over, join the edges and push with your fingers to seal. Crimp the edge to make sure the filling is held inside either using a fork, or by making small twists along the sealed edge. Fold the corners underneath.
-Put the pasties onto the baking tray and brush the top of each with the egg. Bake on the middle shelf of the oven for about 45 minutes or until golden brown. Mine weren't browning fast enough for my liking so I ended up cranking my oven up to about 375ºF for the last 20 minutes. They still could've been darker in my opinion, but they were cooked which is what matters.
The recipes both said "4 servings" however my family of three made it through two pasties between us. They're HUGE and no one in my family has ever been accused of not eating enough. Especially when it comes to pastry. They're equally delicious reheated one or two days later though, so we're not struggling.
Paul's Pasty Recipe
Taste of Home Recipe
Focaccia
Bread
The next night, I bought some soup from an amazing soup place in
Lonsdale Quay in North Vancouver called "The Soup Meister" and made
some focaccia bread to go with it. The soup was delicious, we had a spicy
turkey Milanese tomato based soup and a cream winter harvest vegetable with
chicken. The Winter Harvest Vegetable had orange juice and vanilla in it and
was a bit sweet for our tastes, but still delicious in it's uniqueness.
The bread was a bit time consuming and didn't go exactly as I
would've liked (I was entirely prepared to entitle this post "Focacci-oh
no that didn't work") but in the end despite not rising to my standards
(literally, too flat) the flavour was great and I will definitely seek to
improve my technique.
Full disclosure: this is not a recipe to be made if you a) don't
like the smell of olives or olive oil.
b) don't like getting your hands dirty
or c) the "squelchy" sounds gooey things make make you
feel a bit ill.
For the bread you will knead:
 250 g strong white bread flour
1 tsp salt
1 package easy blend yeast (or 2 1/4 tsp fast rising yeast)
1 tbsp olive oil
200 ml cold water
olive oil for drizzling
fine sea salt
fresh or dried herbs of your liking (I chose rosemary and
oregano)
-Place your flour, salt, yeast, olive oil and 150 ml of water in
a bowl. Using a wooden spoon mix until a dough is formed. Knead the dough in
the bowl for five minutes, gradually adding the remaining water.
-Stretch the dough by hand, tuck the sides into the centre,
rotate the bowl 80 degrees and repeat the process for about five minutes.
OR do the Holly way which was stretch the dough, become confused
and proceed to stretch and squish the dough like a child with play dough for
five minutes.
-Tip the dough onto an oiled work surface and continue kneading
for five minutes. I used an obscene amount of oil for this because the dough
would just soak it up and start to stick to my countertop. I don't know if that
was a mistake or not.
-Return the dough to the bowl, cover, and let rise until doubled
in size.
-Line a baking tray with parchment paper. Tip the dough onto the
baking sheet and flatten it to reach all corners (or as close as you can get).
Leave to prove for one hour.
-Preheat oven to 220ºC or 425ºF. Drizzle loaf with olive oil and sprinkle with salt and herbs.
Bake for about 20 minutes.

My dough did not rise. It
rose a little the first time and then barely at all during the second prove. I
don't think it was warm enough in my kitchen and I couldn't use the
"proof" setting on my oven as I was baking cookies at the time. There
were parts of my bread that were so thin they were basically crackers, but it
was all delicious and every crumb was gobbled up by my carb loving family.!
Oh, and the day after my accident, I got a letter in the mail.
It's time to renew my driver's license! I do love irony.
-Holly
ps. How pretty are those pasty photos!?


